Three hours.
You walk out knowing how to build a working tool
yourself.
A live workshop for behavior analysts. You type plain English, not code.
Founding cohort begins in
--Days:--Hours:--Minutes:--Seconds
For behavior analysts who want to stop watching AI from the sidelines. You chat with the AI about your articles, your data sheets, your folders of PDFs, and walk out knowing how to build a working tool yourself. No FERPA- or HIPAA-protected data for this workshop.
Cameras on during demos. Share in chat. Two instructors, thirty builders.
If you are still confused after the workshop, did not get to demo what you built, or hit a wall a week later, email me and book a follow-up call. One free follow-up call with Dr. Luczynski if you need it — up to 30 minutes, within 30 days of the workshop.
We are not AI specialists. Neither of us went to school for computer science, and neither of us has formal training in artificial intelligence. We have learned the basics of one tool, applied it to our own work over the last eight months, and want to make sure behavior analysts know what is now possible. The tool is called Claude Code. The name is misleading: you do not write any code. You type sentences in English. The skill is describing what you want clearly — the same skill you already use to write a behavior plan.
The tooling that makes this workflow practical — describing what you want in plain English and getting a working tool on your laptop — came together in late 2025. The pieces matured around November. Eight months later, the on-ramp finally exists, and the workshop catches you up on what changed.
One more piece of timing. Through July 13, Anthropic raised Claude Code limits on paid plans. The weekly cap is up 50 percent, and the shorter rolling limit (the one that matters most during a single working session like this workshop) was recently doubled. Our June 16 workshop sits inside that window. The same $20 plan buys more working time than it normally would, which makes the next several weeks the right moment to learn this tool and use it heavily.
Receipts
Real usage. Not theory.
One of us has spent the last year using this tool every week. The numbers below come straight from Kevin’s Claude Code dashboard.
Exchanged with the tool, last twelve months
151,465
Messages
I described what I wanted in plain English. Claude wrote the code.
Sessions
535
Total tokens
174.2M
Active days
64
Token equivalent
~238×War and Peace
Source: Claude Code usage dashboard, June 2026. Behavior consultant by training. No computer science degree. No formal AI training. What it takes is describing what you want clearly. That is the same skill behavior analysts already use to write a behavior plan.
On the energy and water concern that often follows numbers like these — see the FAQ.
Six tools we have built
Examples of what you could build.
Each of the six below is a real tool one of us built in plain English in Claude Code over the last eight months. They cover teaching and practice, clinical tools, data visualization, and lit review. You bring the problem. We help you describe it clearly enough that Claude Code can produce a working version.
01 / Teaching & Practice
Study Cards / SAFMEDS
Turn any concept list into printable SAFMEDS-style flashcards with one prompt. Spaced-retrieval practice for stats, definitions, and behavioral procedures. Possible live demo at workshop
02 / Clinical Tool
Paired Stimulus Preference Assessment Generator
Enter how many stimuli, type each name, set replications, and out comes a printable data sheet pre-populated with left-right counterbalancing and a clean scoring grid. Replaces the Word-template gymnastics most BCBAs still do by hand. Possible live demo at workshop
03 / Data Visualization
Graph Creator
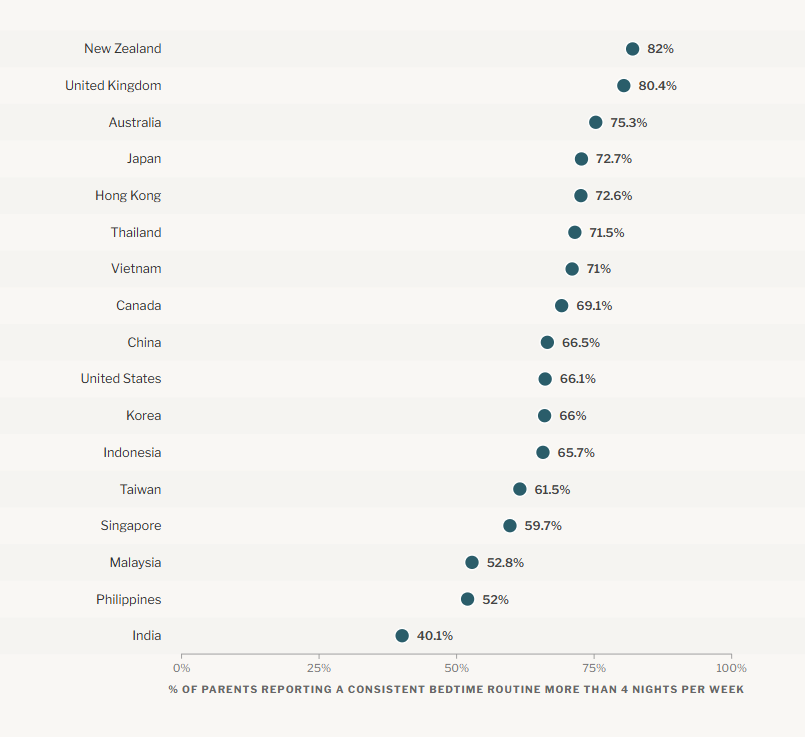
Drop in raw data — or rechart someone else's published figure — and turn it into a NYT-, JAMA-, or JABA-style chart. Useful when you are not yet sure which visualization tells the story best. Helpful for posters, lit-review figures, single-case-design graphs, and exploring a dataset before the chart is final. The sleep graph at left was recharted from Mindell et al. (2010). Possible live demo at workshop
04 / Lit Review Workflow
Personalized PDF Research Library
One workflow, two steps. First, drag a folder of messy PDFs in; Claude renames every file with a convention you set (author-year-title across the whole folder in seconds). Then those clean files become a searchable, filterable library, sliced by outcome, design, sample, or any field you encode. Coverage maps show which slices of the literature you actually have. Kevin built one across 105 sleep-research PDFs; same workflow scales to any topic. Possible live demo at workshop
05 / Clinical Tool
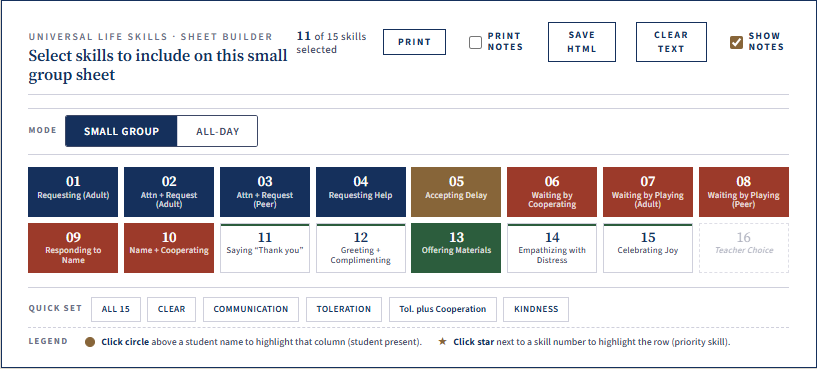
Quickly Customizable Data Sheet
Real teaching data sheet teachers print every week, with one layer added on top. Open the same file in a browser and you can type directly into cells, click to mark scoring, save the marked-up sheet as HTML, and toggle which columns appear that day. The print version is untouched — same file works both ways. The approach scales to any print sheet you already use: keep the paper workflow your team is trained on, and add a digital layer over it. Possible live demo at workshop
06 / Clinical Tool
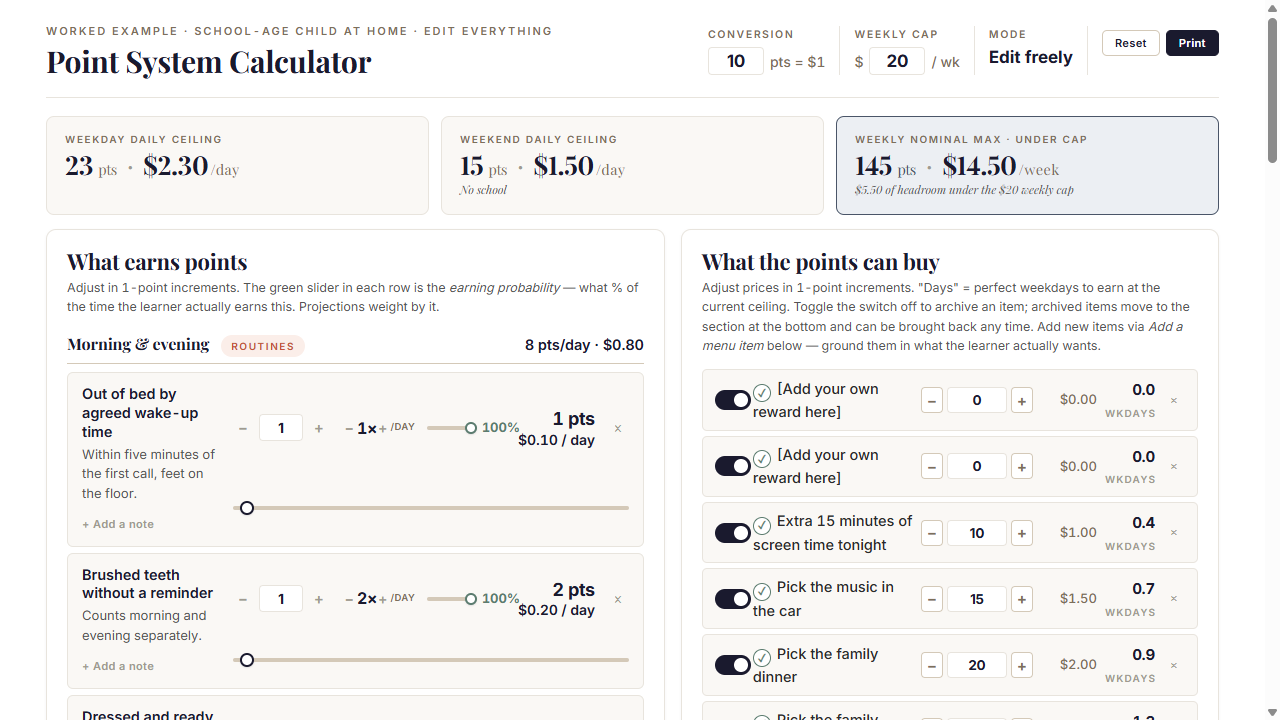
Token Economy Point Calculator
Design a token economy with your family or your client and see the math before you commit. Set the points-to-dollars conversion, daily and weekly caps, and the probability the learner earns each behavior. Two columns — what earns points, what the points can buy — recalculate live as you adjust. Once it pencils out, print the configured chart and start. Possible live demo at workshop
Possible live demos at the workshop
Any of the tools above could be the live build on the day. We build in front of you in real time, on Claude Fast Mode — typos, mid-prompt corrections, course changes, all of it. Then you open your laptop and build your own. The workshop is the on-ramp. The ceiling is what you build the next week.
Who this is for
Built for behavior analysts.
If you have ever run a paired-stimulus preference assessment, written a behavior plan, or graphed within-subject data, you have the background this workshop assumes. Practitioners, supervisors, researchers, and the students working alongside them are all welcome.
✓ This is for you if
You already use ChatGPT or Claude to write text, build a table, or make a slide deck, and you want to go further: build the actual interactive tool, not just generate words inside a chat window.
You have a tool, tracker, or dashboard in your head that you wish existed, and you do not know how to make it real.
You see the same tedious task on your desk every week and want it gone.
You want to build something this week, not next quarter.
You have paid for AI workshops before and walked out without a working tool. We have done the same thing. That is why this exists.
You can describe a problem in plain English. Same skill you use to write a behavior plan.
× This is not for you if
You can already build polished, interactive tools from scratch, by hand or by directing an AI, like the examples above. That is the skill this workshop teaches, and you already have it. Save the $48. Using ChatGPT or Claude to write documents, build a table, or draft a slide deck does not count here. That is most of who we built this for.
You already use Claude Code regularly. This is a beginner cohort.
You expect to use FERPA- or HIPAA-protected information. No client data, no IEP records, no PHI in any demo.
You want to watch. Every participant builds during the session.
A Note From Kevin
Eight months ago, I could not have created any of these tools and documents.
I am a behavior consultant by training. I do not have a computer science degree, and I have not taken an AI course. What I have done is take seven paid AI workshops in the last year, walk out of most of them empty-handed, and spend eight months figuring out how to actually use Claude Code in my own work.
Most people think Claude Code is for programmers. It is not. What it takes is describing what you want clearly, in plain English. That is the same skill behavior analysts already use when we write a behavior plan.
Here is the math. I paid $2,713 across seven AI workshops last year and spent eight months learning what actually unlocks Claude Code for someone like me. The answer is not a prompt library. It is not a file structure. You talk to Claude the way you would talk to a smart colleague, and you let the creativity that is already in the tool do the work. That is the shortcut. Three hours. $48. One free follow-up call with me if you need it — up to 30 minutes, within 30 days. You walk in with a problem in plain English. You walk out knowing how to build a working tool yourself. If you are still stuck a week later, you email me and we get on a call.
Derek and I built this because we want to help behavior analysts use Claude Code to make their job and their life better. To go from nothing to something. Three hours, thirty seats, two of us in the room with you.
If you have ever paid for an AI workshop and walked out without anything to show for it, I have done that too. That is why this exists.
Kevin Luczynski, PhD, BCBA-D
Universal Behavioral Consulting Services · Omaha
Your Instructors
Two behavior analysts. Not AI specialists.
We are not AI researchers, consultants, or specialists. We have taken paid AI workshops ourselves over the last year. We learned the basics, applied them to our own work, and built the on-ramp we wished we had.
Kevin Luczynski, PhD, BCBA‑D
Behavioral Consultant & Researcher
Pediatric sleep and school-based consultation. Clinical training at Kennedy Krieger Institute and Munroe-Meyer Institute. Built data visualization dashboards across 140 sleep graphs, the personalized PDF research library, a clinical form generator, and a file renaming system that enforces a folder-wide naming convention.
Derek Reed, PhD, BCBA‑D
Director, Applied Behavioral Sciences
Author of a behavioral economics textbook (2nd edition). Built the Paired Stimulus Preference Assessment Generator, the SAFMEDS flashcard app, and a personalized PDF research library, all in plain English in Claude Code over the last eight months.
How the Day Works
Four ingredients.
Three hours, built around the same four ingredients: live builds on Fast Mode, you in your seat building, both of us available the whole time, and one collective show-and-tell at the end.
1
Live (may be recorded)
Both instructors build in real time on Claude Fast Mode. Typos, mid-prompt corrections, course changes, all of it. The session may be recorded for replay; the experience is built around showing up live.
2
Camera-on small group
Thirty builders, two instructors, all visible to each other. We rotate through breakout rooms during build time so both of us touch every group.
3
Independent build time
You open your laptop and build. Both of us are available the whole time.
4
Show and tell
At the end, volunteers share what they built. You see what is possible and what to build next.
Founding Cohort
One price, no upsells.
Founding Cohort Pricing
$48
$388 Kevin’s average
For reference, Kevin paid an average of $388 per workshop across the seven AI workshops he attended last year. He walked out of most of them empty-handed. This one costs $48, includes one free follow-up call with Dr. Luczynski if you need it (up to 30 minutes, within 30 days), and is taught by someone who has been on your side of the table.
Why $48. This is the founding cohort. You are the first public room, your feedback shapes what we build next, and the price reflects that trade. Pricing for future cohorts gets announced after this one.
One seat in the live 3-hour session
Setup kit and walkthrough
If you have any trouble with the setup, email Dr. Kevin Luczynski at Dr.L@universalbcs.com. We will get you through it before the session opens.
Every tool you build is yours to keep
One free follow-up call with Dr. Luczynski if you need it (up to 30 minutes, within 30 days). If you are still confused after the session, did not get to demo what you built, or hit a wall a week later, email Kevin and book the follow-up call.
Claude Pro subscription required ($20 / month, separate from ticket). Cancel anytime after the session.
The Setup Check · Required
You must confirm your setup works before you attend.
Kevin has attended seven paid AI workshops over the past year, spending $2,713 across them. In several of those sessions, almost a third of the workshop went to troubleshooting initial setups for attendees. That time was a tax on everyone in the room. We are not doing that to you.
A heads-up on hardware. These steps require a Windows or Mac computer that is yours personally — phones and tablets will not work, and work-managed devices (schools, hospitals, universities, many clinics) typically block the app installs Step 1 requires. If a work device is your only option, email your IT department in advance and ask them to allow installs from Anthropic PBC (Claude Desktop App), plus Git for Windows on a Windows machine or Apple’s Command Line Tools on a Mac. If your computer is more than five years old, expect some steps to take thirty to sixty seconds to respond; wait, do not re-click.
Reading this on your phone? These steps run on your computer, not here. Email yourself this link and open it when you are at your laptop.
Heads-up before you start
These steps are our best map of what you will see — not a guarantee that everything matches exactly.
We pilot-tested these steps on multiple Windows machines with real, non-technical users. Even on Windows, there was real variability in what the installer, the operating system, and Claude Desktop App prompted from one computer to the next — some setup screens appeared for one tester and not the next, and new dialogs showed up that we never anticipated. The Mac path has not been pilot-tested yet, so Mac users should expect the steps to be even more of a map than a script. Read the steps as a strong map of what we are asking you to do, then use your own judgment to bridge small differences you encounter. If you get truly stuck on something the steps do not cover, email Dr. Kevin at Dr.L@universalbcs.com and we will get you through it.
Step 1
Install Claude Desktop App
Step 2
Download the prep kit
Step 3
Confirm your setup works
Step 4
Submit your Readiness Card
Step 5
Pay for the workshop
Step 6
Receive your Zoom link
Click to copy. Throughout these steps, click (or tap) any highlighted code like claude.com/download or Ctrl + Alt to copy it to your clipboard. The chip flashes Copied in green when it works. Saves you from highlighting and right-clicking each time.
Stuck at any step? Email Dr. Kevin Luczynski at Dr.L@universalbcs.com. We will get you through it before the workshop opens.
About "Downloads folder." These steps mention your Downloads folder a lot because that is where downloads land by default. If you save to your Desktop instead (a common alternative), substitute that everywhere we say "Downloads." The workshop does not care where the files live. If you ever lose track of a downloaded file: press Ctrl + J (Windows) or Shift + Cmd + J (Mac) to open your browser's download history. The most recent file appears at the top with a Show in folder link that opens its exact location.
Working from one screen?Switching between this page and Claude Desktop App will eat time. Print these steps (or save as a PDF) so you can read them while you work.
Show steps for
Showing the steps for your computer.
Install Claude Desktop App.
GoalInstall the free Anthropic desktop app, sign in, and upgrade to Pro — so Claude can run code on your computer when you get to Step 3. No terminal, no command line.
Windows
Open your preferred web browser (Microsoft Edge, Google Chrome, Firefox; all of them work).
Click the address bar at the top of the browser window (the long text box where web addresses go). Type claude.com/download and press Enter.
The page loads. Two large buttons sit side by side at the top: Download for Windows and Windows (arm64). Click Download for Windows — that is the right one for almost every PC. The arm64 button is only for newer Snapdragon-based Surface and Copilot+ PCs; if you do not know what you have, click the standard Windows download.
A file named Claude-Setup.exe (or similar) downloads to your Downloads folder, your Desktop, or any location you like — some browsers pop up a Save As dialog before the download starts so you can choose where it goes. Most browsers also show the recent download as a small downward arrow indicator in the top-right of the browser window (click it to find the file). Firefox shows a similar arrow in the same place.
Open the installer. Click the file in your browser's download bar/tray. If you do not see it there, open File Explorer (the yellow folder icon in your taskbar at the bottom of the screen), navigate to wherever you saved it (Downloads in the left sidebar is the default; check your Desktop if it is not there), and double-click Claude-Setup.exe.
If SmartScreen warns ("Windows protected your PC"), click More info, then click Run anyway. The installer is signed by Anthropic; SmartScreen flags any new application by default.
Most users will never see "Trusted app installs must be enabled to install Claude" and can skip this whole stumble. If your installer does show this dialog (a rare gate that ships on by default on some fresh Windows 11 builds), walk through these sub-steps, then re-run the installer:
5a. Press the Windows key (or click the magnifying-glass search icon in the taskbar). Type advanced system settings and click the result.
5b. Scroll to find Developer mode and toggle it On.
5c. Click Yes on the confirmation prompt. Windows warns that developer features may expose your device; that warning is expected.
5d. If a second prompt asks whether to allow apps from outside the Microsoft Store, click Allow.
5e. Close Settings and re-run Claude-Setup.exe. If you still see the gate, email Dr. Kevin (Dr.L@universalbcs.com) — this dialog has multiple causes and the fix may need to be different on your machine.
Windows may ask "Do you want to allow this app to make changes to your device?" Click Yes.
The Claude Desktop App installer opens. Click Install. Wait for the progress bar to finish (about thirty seconds).
The installer closes when the progress bar finishes. Two new icons exist on your computer now: the orange spiky Claude icon on your desktop (that is the app you launch from now on), and Claude-Setup.exe still sitting wherever you saved it (usually Downloads, sometimes Desktop). That second file is the installer, which is one-time use only. Leave it where it is for now; you will delete it at the very end of Step 1, once the app is fully set up, so it is still available if anything in the next sub-steps sends you back to re-run the install.
Open Claude Desktop App. It may have launched automatically after the installer closed. If not, double-click the Claude icon on your desktop.
The app opens to a welcome screen. Click Get started.
Sign in with your Claude account. If your browser is already signed in, choose your sign-in method (Google, email, or whichever you use). If you do not have an account yet, click Sign up, enter your email, and follow the verification steps. Sign-in bounces to your browser briefly, then back to the app. If Windows asks "Always allow Claude to open links of this type?" click Cancel for now — this is the safer answer; you can change it later in your browser settings.
If "Log in to Claude" keeps reopening in a loop: close Claude Desktop App completely (click the X in the top-right of the window), then reopen it from your desktop shortcut. The sign-in state usually resolves on a fresh launch. If it does not, sign out, sign back in, and you should land on the home screen.
After sign-in, Claude Desktop App may walk you through up to six first-launch setup screens before the app reaches its home screen. Which screens you see depends on your Claude account history — if you have used Claude before, some have already been answered and will be skipped. If a screen below does not appear for you, no worries; just move on to the next one. When a screen does appear, click these exact answers:
Help Claude improve (data sharing toggle): turn off. We do not need to share your workshop work back to Anthropic to make Claude better.
What should we call you: type your real first name. It is used only inside the app.
Your role: choose "I have my own topic". The other options (Educator, Researcher, Developer, etc.) load demo flows that do not match this workshop.
Camera access: click Not now. The workshop does not use the camera.
Keyboard shortcut (a global quick-open hotkey): turn off. It tends to conflict with other apps and you will not need it.
Show menu bar icon: turn on. This keeps the orange Claude icon visible in your Windows taskbar so the app is easy to relaunch later.
If none of these screens appear at all, that is also fine. Some accounts go straight to the home screen after sign-in. Skip to the next sub-step.
The wizard finishes (or was skipped). Claude Desktop App opens to its home screen in Chat mode.
Check whether you are on Claude Pro. Look at the bottom-left corner of the sidebar. Your account name appears there. If Pro appears next to your name you are already subscribed — skip to the next sub-step. If your name appears without a Pro label, you are still on the free plan and need to upgrade now. The Readiness Card in Step 3 will refuse to generate on Free, and the free message cap runs out before the live workshop reaches Step 3.
If you cannot see your name in the bottom-left corner at all: the desktop app hides the bottom footer when the window is too small. Maximize Claude Desktop App (click the square button next to the X in the top-right) and the footer reappears.
Follow these sub-steps to upgrade and immediately cancel the auto-renewal so you are not charged a second month:
Heads-up: have your phone in hand before you start. This flow sends a 6-digit verification text message to the phone number tied to your credit card. If your phone is in another room, grab it now — the code times out after a few minutes.
Click your name (bottom-left). A small menu opens upward with Settings, Billing, Help, and Sign out.
Click Upgrade in the menu (or click Billing and then Upgrade on the page that opens).
Click Pro Plan.
On the billing-frequency screen, choose Monthly at $20/month. The page defaults to the annual plan ($17/month, $200 billed up front) because it looks cheaper, but annual locks you in for a year. Switch to monthly so you can cancel after one cycle, which is what you want for the workshop.
Enter your card details and address on the payment form. The desktop app does not autofill — type each field by hand and check spelling before continuing.
Anthropic sends a 6-digit verification code by text message to the phone tied to your card. The text does not say "Anthropic" in the sender field — the code just shows up with a generic header, so do not dismiss it as spam. Enter the code.
The page shows Welcome to Pro. You are now subscribed.
Immediately cancel the auto-renewal. Click your name again (bottom-left) → Settings → Billing.
On the Billing page, click Cancel plan at the bottom right of the page. (Do not click Adjust plan; the Cancel plan link is the direct path.)
Claude asks you to confirm. Click Cancel plan again. If a "Why are you leaving?" survey appears, click Skip. The page confirms your plan ends at the end of the current billing month. You keep Pro through the workshop and are not charged next month. If you decide later that you want to keep Pro, you can re-up from the same Billing page anytime.
Delete the leftover installer. Now that the app is fully set up, open the folder where Claude-Setup.exe landed (usually Downloads, sometimes Desktop) and drag Claude-Setup.exe to the Recycle Bin. Leaving it around tends to cause people to re-open it later, get a "Claude is already installed" dialog, and lose ten minutes figuring out what went wrong.
Go to Step 2 below for Windows.
Mac
Open your web browser. Safari is the blue compass icon in the Dock at the bottom of your screen. Chrome and Firefox work just as well if you prefer those.
Click the address bar at the top of the browser window. Type claude.com/download and press Return.
The page loads. At the top is a large Download for macOS button — the page auto-detects you are on a Mac and shows the right download right there. Click it.
If you see Windows download buttons at the top instead of macOS (this can happen on locked-down work Macs with unusual browser settings), scroll down to the Get started section, find the Desktop card, and click the Download button in the macOS row.
Do not install the iOS or Android app for this workshop. The download page also lists Claude mobile apps in a separate Mobile card. Those are the consumer chat app, not Claude Desktop App. You need the macOS desktop installer.
A file named Claude.dmg downloads to your Downloads folder, your Desktop, or wherever you save it.
Open Finder (the blue-and-white smiley-face icon in the Dock). Click Downloads in the left sidebar — if the file is not there, check your Desktop in the same sidebar. Double-click Claude.dmg. A new window opens with a Claude icon on the left, a folder labeled Applications on the right, and an arrow between them.
Click and hold the Claude icon with one finger on your trackpad. Drag it onto the Applications folder shown in the same window. Release. A copy progress bar appears for a few seconds, then finishes.
Eject the disk image. Look at the left sidebar of the open window: a small Claude disk icon appears under Locations. Click the eject arrow next to it. Then open Finder, navigate to wherever you saved Claude.dmg (Downloads for most people, Desktop for some), and drag it to the Trash. The .dmg is the installer; you do not need it again. The app you launch from now on lives in Applications.
Open Claude Desktop App. Press Command + Space to open Spotlight Search (Mac's universal search bar). Type Claude and press Return.
The first time the app opens, macOS may show a security dialog:
(a) If the dialog says "Claude is an app downloaded from the Internet. Are you sure you want to open it?", click Open. You are through.
(b) If the dialog says "Claude cannot be opened because Apple cannot check it for malicious software" (common on work-managed Macs), click Cancel. Then open System Settings → Privacy & Security, scroll to the Security section near the bottom, and click Open Anyway next to Claude. Re-launch Claude from Spotlight.
(c)If Privacy & Security shows no Open Anyway button next to Claude, your Mac is locked down by your school or workplace IT. Email IT and ask them to allow the developer "Anthropic PBC." This is a one-line request your IT department can handle in minutes. If they cannot or will not, you need to use a personal Mac for the workshop.
The app opens to a welcome screen. Click Get started.
Sign in with your Claude account. If your browser is already signed in, choose your sign-in method (Google, email, or whichever you use). If you do not have an account yet, click Sign up, enter your email, and follow the verification steps. Sign-in bounces to your browser briefly, then back to the app. If your browser asks "Allow this website to open Claude?" click Cancel — the simpler answer; you can change it later in browser settings.
If "Log in to Claude" keeps reopening in a loop: quit Claude Desktop App completely (Cmd+Q, or click Claude in the menu bar → Quit Claude), then reopen it from Spotlight (Cmd+Space, type Claude, Return). The sign-in state usually resolves on a fresh launch. If it does not, sign out, sign back in, and you should land on the home screen.
After sign-in, Claude Desktop App may walk you through up to six first-launch setup screens before the app reaches its home screen. Which screens you see depends on your Claude account history — if you have used Claude before, some have already been answered and will be skipped. If a screen below does not appear for you, no worries; just move on to the next one. When a screen does appear, click these exact answers:
Help Claude improve (data sharing toggle): turn off. We do not need to share your workshop work back to Anthropic to make Claude better.
What should we call you: type your real first name. It is used only inside the app.
Your role: choose "I have my own topic". The other options (Educator, Researcher, Developer, etc.) load demo flows that do not match this workshop.
Camera access: click Not now. The workshop does not use the camera.
Keyboard shortcut (a global quick-open hotkey): turn off. It tends to conflict with other apps and you will not need it.
Show menu bar icon: turn on. This keeps the Claude icon visible in your macOS menu bar so the app is easy to relaunch later.
If none of these screens appear at all, that is also fine. Some accounts go straight to the home screen after sign-in. Skip to the next sub-step.
The wizard finishes (or was skipped). Claude Desktop App opens to its home screen in Chat mode.
Check whether you are on Claude Pro. Look at the bottom-left corner of the sidebar. Your account name appears there. If Pro appears next to your name you are already subscribed — skip to the next sub-step. If your name appears without a Pro label, you are still on the free plan and need to upgrade now. The Readiness Card in Step 3 will refuse to generate on Free, and the free message cap runs out before the live workshop reaches Step 3.
If you cannot see your name in the bottom-left corner at all: the desktop app hides the bottom footer when the window is too small. Maximize Claude Desktop App (click the square button next to the X in the top-right) and the footer reappears.
Follow these sub-steps to upgrade and immediately cancel the auto-renewal so you are not charged a second month:
Heads-up: have your phone in hand before you start. This flow sends a 6-digit verification text message to the phone number tied to your credit card. If your phone is in another room, grab it now — the code times out after a few minutes.
Click your name (bottom-left). A small menu opens upward with Settings, Billing, Help, and Sign out.
Click Upgrade in the menu (or click Billing and then Upgrade on the page that opens).
Click Pro Plan.
On the billing-frequency screen, choose Monthly at $20/month. The page defaults to the annual plan ($17/month, $200 billed up front) because it looks cheaper, but annual locks you in for a year. Switch to monthly so you can cancel after one cycle, which is what you want for the workshop.
Enter your card details and address on the payment form. The desktop app does not autofill — type each field by hand and check spelling before continuing.
Anthropic sends a 6-digit verification code by text message to the phone tied to your card. The text does not say "Anthropic" in the sender field — the code just shows up with a generic header, so do not dismiss it as spam. Enter the code.
The page shows Welcome to Pro. You are now subscribed.
Immediately cancel the auto-renewal. Click your name again (bottom-left) → Settings → Billing.
On the Billing page, click Cancel plan at the bottom right of the page. (Do not click Adjust plan; the Cancel plan link is the direct path.)
Claude asks you to confirm. Click Cancel plan again. If a "Why are you leaving?" survey appears, click Skip. The page confirms your plan ends at the end of the current billing month. You keep Pro through the workshop and are not charged next month. If you decide later that you want to keep Pro, you can re-up from the same Billing page anytime.
Go to Step 2 below for Mac.
Download the prep kit.
GoalGet the workshop's working folder onto your computer so Claude can read it in Step 3.
The prep kit (~14 MB) contains fourteen highly-cited JABA papers (Baer, Wolf, & Risley 1968; Stokes & Baer 1977; Iwata et al. 1994; Hanley et al. 2003; and friends) you will rename and organize during the workshop, a sample classroom dataset, and a real parent sleep-study dataset for the data-visualization demo.
Windows
Click the Download the prep kit button below. The file workshop-prep.zip downloads to your Downloads folder, your Desktop, or wherever you save it.
Open File Explorer (the yellow folder icon in your taskbar at the bottom of the screen) and navigate to wherever the zip saved — Downloads in the left sidebar is the default; check your Desktop if it is not there.
If the folder you saved to hides the .zip extension, look for a file named workshop-prep with a zipper icon. Same file; Windows is hiding the extension by default.
Right-click workshop-prep.zip. Choose Extract All… from the menu.
A dialog opens asking where to extract. Click Extract at the bottom right (the default location is fine). A new folder appears named workshop-prep right next to the zip file. This new folder is what you will point Claude at in Step 3 — not the original .zip file (with the zipper icon), which you can ignore from here on out.
Leave the workshop-prep folder right where it is, wherever it landed (Downloads or Desktop, whichever your browser used). Step 3 will ask you to point Claude Desktop App at this folder; the exact location does not matter. Done with Step 2.
Mac
Click the Download the prep kit button below. The file workshop-prep.zip downloads to your Downloads folder, your Desktop, or wherever you save it.
Open Finder (the blue-and-white smiley-face icon in the Dock) and navigate to wherever the zip saved — Downloads in the left sidebar is the default; check your Desktop if it is not there.
If the folder you saved to hides the .zip extension, look for a file named workshop-prep with a zipper icon. Same file; macOS is hiding the extension by default.
Double-click workshop-prep.zip. macOS unzips it automatically and a new folder appears named workshop-prep. This new folder is what you will point Claude at in Step 3 — not the original .zip file, which you can ignore from here on out.
If double-clicking the zip opens it in The Unarchiver or another non-default app and you get no visible workshop-prep folder, right-click workshop-prep.zip in Finder, choose Open With, then Archive Utility (default). macOS unzips it cleanly.
Leave the workshop-prep folder right where it is, wherever it landed (Downloads or Desktop, whichever your browser used). Step 3 will ask you to point Claude Desktop App at this folder; the exact location does not matter. Done with Step 2.
Generate your Readiness Card.
GoalHave Claude produce a Readiness Card from your prep folder, then save it as a PNG you can submit in Step 4.
Open Claude Desktop App the same way you opened it in Step 1. The app opens to its home screen in Chat mode by default.
Maximize the Claude Desktop App window. Click the square button next to the X in the top-right corner. A smaller window can hide the tabs you need in the next step, and it is a common reason this part fails.
Switch to Code. Along the top center of the window are three tabs: Chat, Cowork, and Code. Click the Code tab. Ignore the other two for this workshop: Chat is plain conversation with no access to your files, and Cowork is a separate cloud agent. We use Code only. (The first time you open Code, you may see a short dashboard or usage stats; that is fine.)
If you do not see a Code tab at the top of the window, you are on an older Claude Desktop App build. Click your name or profile icon in the bottom-left corner of the app, choose Settings, and check for updates. Quit and reopen Claude Desktop App after updating.
Windows users: you need Git installed for Code to work. On Windows, Git is required for Code to run on your files. If Git is not already on your machine, Claude Desktop App flags that Git is not installed when you first open Code and shows an install link; install it now using the steps below. (If Git is already installed, no warning appears and you can skip to the next sub-step.)
Already have Git and just do not know it? This orange diamond is Git's logo. A 10-second check: press the Windows key, type git, and look at the search results. If Git Bash appears with this logo, Git is already installed; skip the install steps below and continue to the next sub-step.
Click the install link Claude shows, or open git-scm.com/downloads/win in a new browser tab — that is the right page.
Click the bold Click here to download link near the top of the page (it grabs the 64-bit x64 installer). If you do not see that link, scroll to the Standalone Installer section and click Git for Windows/x64 Setup instead — same file.
Run the downloaded installer. This is the part where your gut tells you something is wrong. It is not. The Git installer has roughly twelve screens of options that look technical (Select Components, Choosing the default editor, Adjusting your PATH environment, etc.). Do not change any default. Just click Next on every screen until the installer finishes. Total time: about five minutes.
On the very last screen the installer shows a Completing the Git Setup Wizard page with two checkboxes (Launch Git Bash and View Release Notes). Uncheck both, then click Finish. Close Claude Desktop App and reopen it from your desktop shortcut so Claude picks up the new Git location; then switch back to Code mode. You will never use Git directly; you only need it installed so Claude Desktop App can find it.
Mac users: you need Git installed for Code to work. Some Macs already have Git and some do not, and macOS does not install it on its own. On a Mac, Git comes inside Apple's free Command Line Tools. Check whether you have it, and install it if needed, using the steps below.
This orange diamond is Git's logo. You may have seen it on your computer before even if you have never used Git directly. The first two steps below check whether your Mac already has it, so you will not install anything you do not need.
Open Terminal: press Cmd + Space, type Terminal, and press Return.
Type git --version and press Return.
If you see a version number (for example git version 2.39.5), Git is already installed. You are done. Skip the rest of this sub-step and continue.
If a window appears asking to install the command line developer tools, click Install, then click Agree to accept the license. If no window appears on its own, type xcode-select --install and press Return to bring it up.
If you are offered a choice to install the full Xcode app from the App Store instead, do not choose that one. It is a large download you do not need; you only need the smaller command line tools.
Wait for it to finish (usually a few minutes). Then type git --version again and press Return; when you see a version number, Git is installed.
Quit Claude Desktop App (Cmd + Q) and reopen it from your shortcut so Claude picks up Git, then switch back to Code mode. You will never use Git directly; you only need it installed so Claude Desktop App can find it.
If Terminal says the command line tools are already installed, that is good news, not an error. Git is already there and you can continue. If anything happens that these steps did not predict, email Kevin at Dr.L@universalbcs.com and we will get you unstuck.
Click + New session near the top of the sidebar.
Three environment options may appear next: Local, Remote, and SSH. If they do, click Local (the first option). On some newer Claude Desktop App builds these three options are skipped and the app goes directly to the folder picker; that is also fine — just proceed to the next step.
A folder picker opens (or click Select folder… if the picker does not open automatically). Navigate to wherever your workshop-prep folder lives (Downloads for most people, Desktop for some), click workshop-prep once to select it, then click Open (Windows) or Select (Mac). Claude opens the folder and automatically reads the CLAUDE.md spec inside.
If Claude Desktop App says it cannot find CLAUDE.md, you opened the wrong folder. Click Select folder… again and pick workshop-prep, not its parent or a folder inside it.
Come back to this page in your browser — the prompt you need is in the black box directly below this step, on this page. Nothing pops up inside Claude Desktop App; the prompt lives here. Click the gold Copy prompt button at the top-right of the black box. The whole prompt copies to your clipboard.
Generate my Workshop Readiness Card now, following the spec in CLAUDE.md.

Name: [Your full name with credentials, e.g., Dr. Jane Doe, BCBA-D]
Institution or Organization: [Where you work — university, lab, school district, clinic, agency, hospital, private practice]
Plan: [Pro — you must be on Claude Pro, $20/mo, before the workshop]
Interests: [Three to five short phrases separated by middle dots]
Research or Clinical Question: [One sentence in your own voice — a research question or a clinical puzzle you are trying to answer]
Favorite Scientific Paper: [Author last name, year. Title. Journal, volume(issue), pages.]
Message to Dr. L and Dr. Derek Reed: [One real sentence to Kevin and Derek]
Switch back to Claude Desktop App. Click inside the chat input at the bottom of the window (the long box that says "Describe a task or ask a question"). Paste with Ctrl + V (Windows) or Command + V (Mac). The prompt fills the box. Paste, but do not press Enter yet — you fill in your answers first (next sub-step), then send.
Which model is selected does not matter. The bottom-right of the chat input shows the current model — Sonnet 4.6, Opus 4.x, or similar. Whatever Claude Desktop App picked by default is fine for the Readiness Card. Do not change it.
Fill in the prompt. Seven lines have square brackets like [Your full name with credentials]. Replace each one — including the brackets themselves — with your real answer. The labels (Name:, Institution or Organization:, etc.) stay exactly as written. The Plan: field must say Pro — if you write Free, Claude stops and asks you to subscribe before generating the card. Look at the example just below to compare blank versus filled. Casual phrasing is fine; do not feel pressure to sound formal.
Example · what filled-in answers look like
Same shape as the prompt above, with one possible set of answers. Do not copy this verbatim — replace with your own work. Casual phrasing is fine.
Generate my Workshop Readiness Card now, following the spec in CLAUDE.md.

Name: Dr. Jane Doe, BCBA-D
Institution or Organization: Springfield Center for Behavioral Health
Plan: Pro
Interests: Early language · Caregiver coaching · Bedtime routines · Single-case design
Research or Clinical Question: Does a quick caregiver interview predict who will need functional communication training?
Favorite Scientific Paper: Hanley, Iwata, & McCord, 2003. Functional analysis of problem behavior: A review. JABA, 36(2), 147-185.
Message to Dr. L and Dr. Derek Reed: Excited to learn how to use AI to build my own tools for the clinic.
If Claude asks the seven prompt questions one at a time instead of accepting all seven at once: that is also fine. Some newer Claude Desktop App builds prefer turn-by-turn. Just answer each one as Claude asks — same answers you would have typed into the bracketed fields.
Press Enter to send the prompt.
If Claude Desktop App bounces you back to a sign-in screen after you press Enter, the app lost track of your session. Close the app completely (X in the top-right on Windows, Cmd+Q on Mac), reopen from your desktop shortcut or Spotlight, sign in again, and re-click + New session. The folder you picked is remembered — you should not have to re-do the folder picker.
Claude proposes its actions one at a time. Each shows a small preview (a "diff") of what is about to be read or written, with Accept and Reject buttons. Click Accept on each — there will be roughly three (a folder check, reading dataset.csv, writing readiness-card.html). Some setups skip these buttons entirely and just run; if you never see Accept or Reject, that is fine — continue to the next sub-step.
If Claude shows a Git error inside the chat (something like "git is not installed" or "Cannot initialize repository") even though you already installed Git for Windows: close Claude Desktop App completely (click the X in the top-right of the window), then re-open it from the desktop shortcut. The error clears after a fresh launch in most cases — and one close-and-reopen is sometimes not enough. One pilot tester needed two or three cycles before Git was recognized, so close and reopen again before trying anything else. If it still persists after that, restart your computer; the system needs to pick up the new Git location in your PATH.
When the app or operating system asks "Allow Once" or "Allow Always" for file or folder access, click Allow Once each time. How many times this appears varies by computer — two or three for some people, five or six for others. However many you get, just keep clicking Allow Once each time. Allow Once is the safer default for a one-time task like this. (Mac users: if macOS shows a system-level dialog instead saying "Claude would like to access files in this folder," click OK.)
Watch the chat. Claude runs three setup checks (Pro subscription, prep folder, dataset), fills your card in with your typed answers, and generates readiness-card.html inside your workshop-prep folder.
The card opens automatically in your default browser or preview app. You do not need to wait for a clickable link in the chat — the file opens on its own. If for some reason it does not open, open your workshop-prep folder and double-click readiness-card.html to open it manually.
On the card page, scroll to the bottom and click the burgundy Issue Card button (it has the subline "save as PNG"). A PNG image of your card saves to your Downloads folder, your Desktop, or wherever you save it. That PNG is what you submit in Step 4. Done with Step 3.
Issue Card is not permanent. You can rerun the prompt with different answers and re-issue the card as many times as you want. Only the PNG you submit in Step 4 counts.
Mac users on Safari: if clicking Issue Card does nothing, Safari is blocking the programmatic download. Open Chrome instead: copy the address bar URL (it starts with file://), paste it into Chrome's address bar, press Return, and click Issue Card again. Or use the screenshot fallback below.
If the Issue Card button does not save the PNG on either browser, screenshot the card instead. Windows: press Win + Shift + S, drag a box around the entire card, release; the PNG saves to your clipboard, paste it into Paint and save. Mac: press Cmd + Shift + 4, drag a box around the entire card, release; the PNG saves to your Desktop. Either screenshot is fine to submit in Step 4.
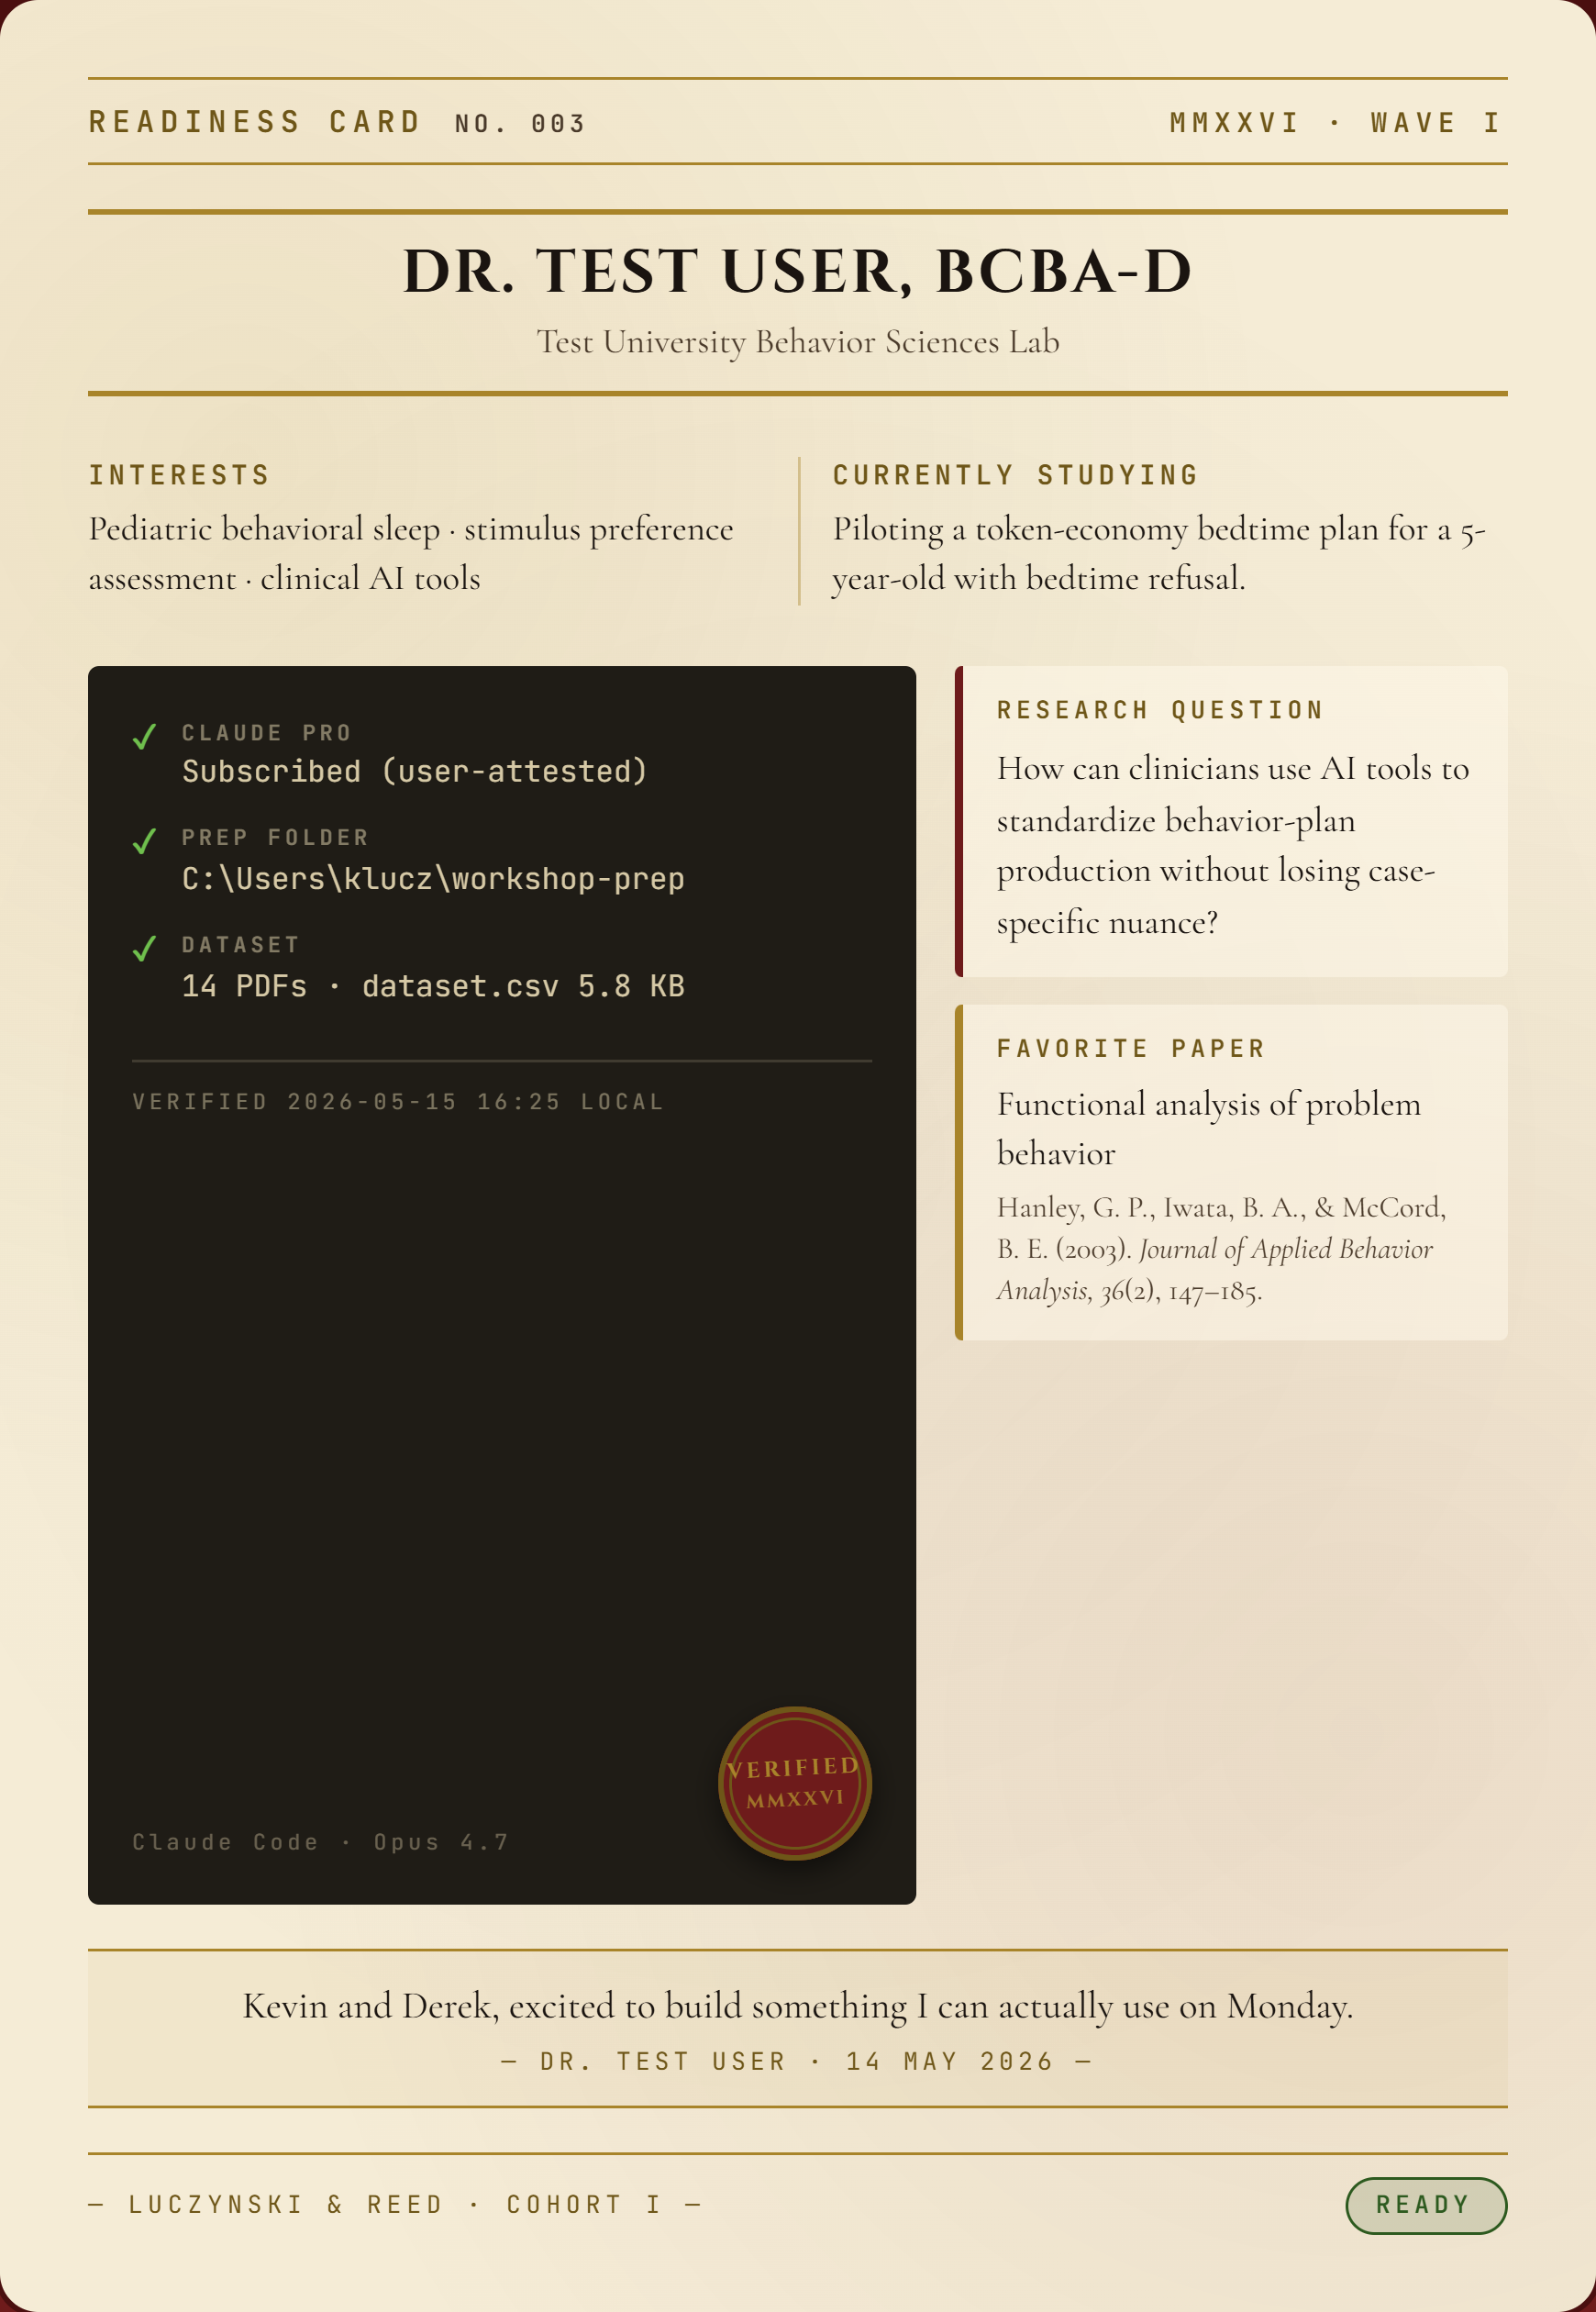
Screenshot 3.B · The Readiness Card (real output from the spec)
Submit Your Readiness Card.
GoalSend us your PNG via the Tally form so we can verify your setup is ready and email you the Stripe payment link.
Click the Submit Your Readiness Card button below. Our Tally form opens in a new tab.
If the form does not load, turn off your ad blocker for the page or open the link in a different browser. Tally is the form host; ad blockers sometimes flag form hosts.
Fill in four short fields: preferred name, preferred email, the Readiness Card upload (next bullet), and a one-line description of what you want to build during the workshop. For preferred email, use a personal address (Gmail, Outlook, iCloud) rather than a school, district, or clinic address; work mail filters routinely block the Stripe payment link you receive in Step 5. (Your professional role and where you work are already on your Readiness Card, so we do not ask again.)
When the form asks for the Readiness Card, click the upload area, navigate to wherever you saved the PNG (Downloads for most people, Desktop for some), and select the PNG you saved at the end of Step 3. The form accepts a PNG, a JPG, or a screenshot — any of them are fine.
Click Submit. The confirmation page starts with "Got it" and explains what happens next (review within twenty-four hours, Stripe link by email, Zoom link on the redirect page right after you pay).
The Tally confirmation email can take a few minutes to arrive. If you do not see it within ten minutes, check Spam and Promotions, then check any "Other" or "Updates" inbox view your provider uses (Comcast, Outlook, and Gmail all have these). If it still does not arrive, your submission still went through — we will email you the Stripe payment link directly within twenty-four hours regardless of whether the confirmation email landed.
Once we approve your card, we email a Stripe payment link. One click, $48.
Watch your email inbox. Approval and the payment link arrive within twenty-four hours of your submission. The approval email includes a promo code — copy it before clicking the payment link.
If you submitted with a work email and the Stripe link will not open, your employer's mail filter is most likely blocking it. Reply to our approval email from a personal address and we will send a fresh link there.
If our email does not arrive within twenty-four hours, check your spam or junk folder. Approval emails from outside your usual contacts sometimes land there.
Open the email. Click the Stripe payment link inside.
Apply your promo code first, before entering any payment information. On the Stripe page, look for a small link labeled Add code — it sits right under the $48.00 price beside the workshop name (near the top of the page on a phone; in the left column on a laptop), and it is easy to miss. Click it, paste the code from the approval email, and click Apply. The total updates immediately.
Enter your payment details on the Stripe page. Click Pay.
Stripe shows a confirmation screen. You will also receive a payment receipt by email.
Receive your Zoom link.
GoalSave the Zoom link from the redirect page Stripe sends you to after payment. That is where you will find it.
After you complete payment, Stripe redirects you to a confirmation page on Universal BCS. Your Zoom link, entry code, and a calendar download are all on that page.
Save the Zoom link before you do anything else. Copy it into a note app, bookmark the page, or screenshot the whole page. The redirect page is where you will find your Zoom link, entry code, and calendar download.
If you navigated away from the redirect page before saving the link, reply to your Stripe receipt email and tell us; we will resend the link directly.
To add the session to your calendar, click the calendar download (the .ics file link) on the redirect page. Outlook, Apple Calendar, and Google Calendar all import it automatically. If your client does not, copy the date and time from the page and create the event manually.
After your setup is confirmed
Optional workshop-day add-on
Steps 1 through 6 above are the hard floor for attending. Everything required is done. The add-on below is not for setup — it is a tool you will use every day after the workshop, for email, Slack, Word, and especially inside Claude Desktop App. Install it the morning of the workshop (not now — later) if you have ten clear minutes.
Speech-to-text, all day long · Wispr Flow
Talk to your computer instead of typing.
Wispr Flow turns push-to-talk dictation into typed text anywhere on your screen. Hold a key, speak a sentence, release — the words appear where your cursor is, with punctuation and capitalization handled for you. This is not just for the workshop. Once installed, you use it every time you would normally type more than a sentence: emails, Slack messages, notes, search bars, and yes, the chat input inside Claude Desktop App. Kevin and Derek both build with Wispr Flow running. It is what makes describing a problem to Claude feel like talking to a colleague, not typing prompts.
Here is what that looks like in practice. My own Wispr Flow numbers:
My Wispr Flow usage ranks in the
Top 0.1%
of all users
Words dictated
919.5K
Speaking pace
159wpm
Do not install this during the required setup above. The signup flow can pop a dialog behind your other windows and freeze your screen, and the password field hides what you type. Workshop setup needs to be calm and complete; come back to this on workshop morning when you have ten minutes to spare and nothing else is competing for your attention.
Sign up takes about a minute; the installer is the same on Windows and Mac. Use the Download button below and you get a free month of Wispr Pro through our referral link — no code to copy, the perk attaches automatically.
Windows
Click the Download Wispr Flow button below. It opens the Wispr Flow signup page in a new tab; the installer downloads after you sign up.
After install, grant microphone and accessibility permissions when macOS prompts (System Settings → Privacy & Security → Microphone, and the same path → Accessibility). Wispr Flow needs both.
If your Mac has an Fn key (most newer keyboards do), hold Fn alone to start dictating.
If your Mac has no Fn key, hold Ctrl + Option together instead.
Speak while holding. Release to transcribe; text appears where your cursor is.
Heads-up on the signup form. The password field hides everything you type and shows no "reveal password" toggle. Decide on a memorable password before you start typing, or use a password manager that fills it in for you. Otherwise you may end up typing it three or four times to be sure.
If your screen seems frozen after clicking Download: the Wispr Flow signup dialog is hiding behind your browser. Press Alt + Tab (Windows) or Command + Tab (Mac) to cycle through open windows until you find it. Click to bring it forward. The "frozen" screen is just waiting for you to interact with the hidden dialog.
Pricing. Workshop attendees who sign up through the Download button above get a free month of Wispr Pro (our referral link, no code required). After that, 2,000 words per week stays free forever on the Basic plan (enough for the workshop and casual use afterward), or $15/month for unlimited usage. Students get 50% off Pro plus a 90-day extended trial — worth checking if you are faculty-affiliated.
Frequently asked
The questions everyone asks first.
Do I need any programming experience?
No. You type sentences in English. The skill is describing what you want clearly — the same skill you already use when writing a behavior plan. Claude Code is the name of the tool, not a description of what you have to do.
Is this the same as ChatGPT?
No. This uses Claude Code, which builds working interactive applications from your descriptions and produces files on your computer that you own. The on-ramp matured in late 2025, which is why this kind of workshop was not possible a year ago.
I already use ChatGPT every day. Is this too basic for me?
If you use AI to write emails, summarize articles, draft reports, or make a quick table, you are not too advanced for this. You are exactly who it is for. That is AI as a writing assistant. This workshop teaches a different skill: directing AI to build a working, interactive tool that lives as a file you own, such as a calculator, a data dashboard, a form, or a report generator, not text inside a chat window. Most people who use ChatGPT daily have never crossed that line. We get you across it in one session.
Can I build a dashboard that pulls my data together?
Yes. Custom dashboards and data visualizations are among the most common things people build. You bring the data, a spreadsheet you export or numbers you can paste, and you build a view that summarizes it the way you want: outcome trends, satisfaction scores, whatever you track. One honest boundary: this is not a live enterprise reporting platform that auto-connects to your organization’s databases and refreshes on its own. What you get instead is full control to design and own the tool yourself. For a lot of people, that is the part they actually wanted.
Why cap it at 30 seats?
So every participant gets individual attention when stuck. Two instructors supporting thirty builders is the upper edge of what works without losing the personal feel. We rotate through breakout rooms during build time so both of us touch every group.
What happens if I leave the workshop still confused?
Email Kevin and book a follow-up call. One free follow-up call with Dr. Luczynski if you need it — up to 30 minutes, within 30 days of the workshop. If you did not get to demo what you built during the session, if you hit a wall a week later, or if something we covered did not stick, that is what the follow-up is for. Once you can create things with HTML, how you work is altered. Kevin is not letting you leave with $48 spent and nothing usable.
Are there CEUs?
No. This is a tools workshop, not clinical content. You leave with a tool, not a certificate.
What about the energy and water concern with AI?
A fair question, and a real one. Training and running large AI models consumes meaningful amounts of electricity and water — for data-center cooling and power generation. People in our field are right to ask about it.
Honest answer: we know less than we should. Estimates from peer-reviewed research (notably Li, Yang, Islam, & Ren, 2023, "Making AI Less Thirsty," University of California Riverside) suggest a single AI prompt may use somewhere in the range of 10 to 25 milliliters of water and a few watt-hours of electricity. The much larger footprint sits in industrial-scale model training and data-center construction — not in individual professional use. These numbers are estimates, vary widely by model and data center, and the industry has only recently started publishing per-query figures.
What we do here: we use AI deliberately, not casually. We push the providers we use to publish their figures and reduce their footprint. We will not pretend the concern is unfounded. If you decide the environmental cost outweighs the professional value for you, that is a fair call.
How do you think about responsible AI use?
Four commitments we operate under and recommend to every attendee.
1. Cite your sources. When you pull a claim, a number, or a framework from a paper or a colleague, cite it. Claude wrote the paragraph; the underlying idea still belongs to whoever published it first. Use the same citation discipline you would for any research-informed writing.
2. Verify every numeric claim. Large language models hallucinate citations, statistics, and even author names confidently. The skill this workshop teaches is using AI to draft and verify, not just draft. If a Claude output cites a study, open the study before quoting from it.
3. Protect client and family data. Do not paste protected health information, FERPA-protected student data, or any identifying details into an AI prompt. De-identify aggressively. Anthropic documents which plans store prompts for review and which do not — check your account settings — but the safer professional default is: assume any text you send leaves your control, and write accordingly.
4. Get consent when relevant. If you are using AI to generate content that will be used directly with the people you serve — clinical plans, parent-facing materials, intervention scripts — the people you serve get to know. Tell families. Tell teachers. Be explicit about which parts came from Claude and which came from you.
For the deeper academic conversation on bias, equity, privacy, consent, and AI literacy in our field, the work to follow is Project CHIRON, the AI literacy series for ABA professionals from Ryan O’Donnell and Dr. David J. Cox. Read them there; build with us here.
Ready to build something this week?
Begin the setup check. Forty-five minutes from now, you will know whether your laptop is ready.